Using Gift subscriptions with Shopify 1.0 themes
Gift subscriptions provide an option for your customers to gift subscriptions and is designed to work with 2.0 Shopify themes.
This guide covers how you can update your Shopify 1.0 theme to work with Gift subscriptions.
Platform:
- Shopify Checkout Integration
- Migrated Shopify Checkout Integration
Before you start
- Gift subscriptions are currently available to stores on the Recharge Plus or Custom pricing plans or a custom pricing plan and can only be used on the Affinity customer portal theme or custom themes.
- This guide only applies to merchants using Shopify 1.0 themes.
- If you are using a Shopify 2.0 theme, you likely do not need to custom code the widget. Adding the Gift Widget to a 2.0 theme code is only necessary if your theme is heavily customized. Try accessing the Recharge gifting widget before hardcoding the widget.
- This guide requires custom code and is not supported by Recharge as per the design and integration policy. If you require further assistance, work with a third-party developer.
Customize the product template
Gift customer data is only created after you've configured the product correctly in Recharge as a gift product. Follow the instructions outlined in the Gift subscriptions to configure a product as a gift.
To customize the product template:
-
In your Shopify theme, open the product template file (product-template.liquid).
-
Locate the section where your product details are displayed.
-
Add the following code block. This code is configured to only show the widget on products with the word gift in their titles. Ensure that you name your products accordingly or modify the condition to match your criteria:
{% if product.title contains 'Gift' %} <form id="gift_form"> <label for="gift_recipient_first_name">Recipient first name</label> <input id="gift_recipient_first_name" type="text" name="properties[__rc_gift_recipient_first_name]" required maxlength="50" pattern=".*\S+.*" /> <label for="gift_recipient_last_name">Recipient last name</label> <input id="gift_recipient_last_name" type="text" name="properties[__rc_gift_recipient_last_name]" required maxlength="50" pattern=".*\S+.*" /> <label for="gift_recipient_email">Recipient email</label> <input id="gift_recipient_email" type="email" name="properties[__rc_gift_recipient_email]" required maxlength="320" /> <label for="gift_message">Gift message</label> <textarea id="gift_message" name="properties[__rc_gift_recipient_note]" rows="3" maxlength="200" ></textarea> <label for="gift_sender_name">Sender name</label> <input id="gift_sender_name" type="text" name="properties[__rc_gift_sender_name]" maxlength="50" /> <label for="gift_notification_scheduled_at">Send gift on</label> <input id="gift_notification_scheduled_at" type="date" name="properties[__rc_gift_notification_scheduled_at]" /> </form> {% endif %} -
Use
minandmaxvalues in JavaScript to keep the date picker dynamic. This ensures that the Send gift on date is always valid based on the current date and your defined maximum months in the future.
WarningAvoid nested or separate forms (ie. use
<form id="product_form">instead of<form id="gift_form">to avoid errors with validation, and the submit process. To ensure the validation works use a single form for the entire page, or just for the area where you included the code above.
Trigger validation
Use JavaScript to trigger validation methods:
checkValidity(): Checks whether the form is valid but does not display messages.reportValidity(): Checks validity and displays native browser validation messages
document.getElementById('gift_form').checkValidity()
document.getElementById('gift_form').reportValidity()
Customize the cart template
To customize the cart template:
- In your Shopify theme, open the cart template file (cart-template.liquid).
- Within the cart template, locate the {% for item in cart.items %} loop. This loop iterates through the items in the shopping cart.
- After the block that displays {{ item.product.title }}, add the following code:
<p>Notify Date: {{ item.properties['__rc_gift_notification_scheduled_at'] }}</p>
<p>Sender Name: {{ item.properties['__rc_gift_sender_name'] }}</p>
<p>Gift Note: {{ item.properties['__rc_gift_recipient_note'] }}</p>
<p>Recipient Email: {{ item.properties['__rc_gift_recipient_email'] }}</p>
<p>Recipient First Name: {{ item.properties['__rc_gift_recipient_first_name'] }}</p>
<p>Recipient Last Name: {{ item.properties['__rc_gift_recipient_last_name'] }}</p>
Test the functionality
To test the gift subscriptions functionality:
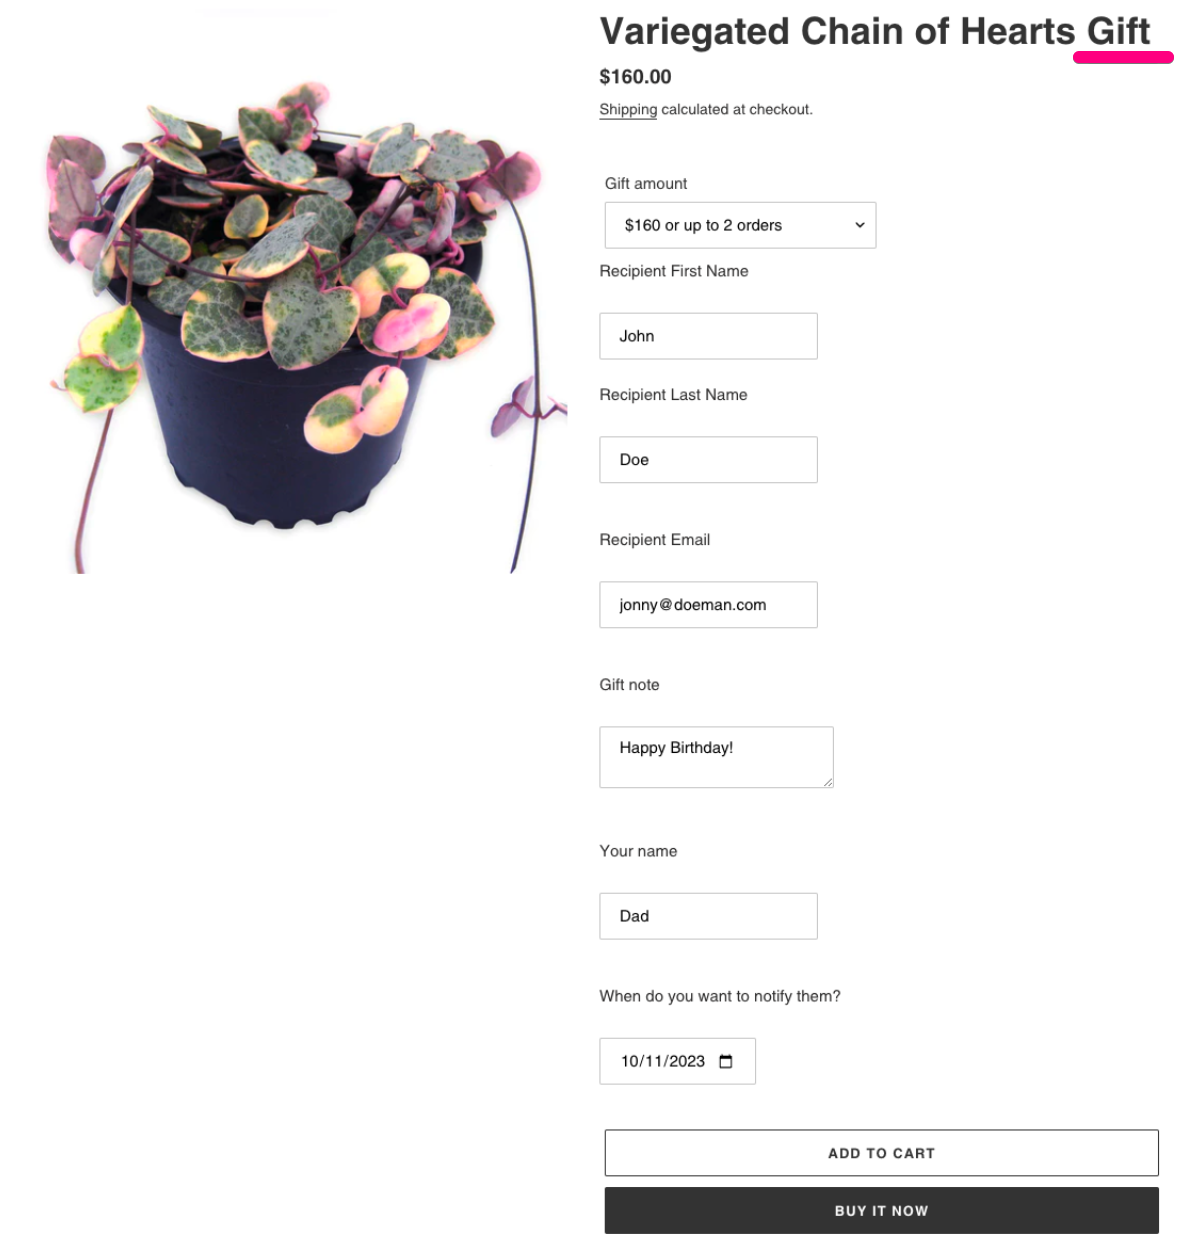
-
After adding both code blocks, test gift subscriptions functionality by going to a gift product on your store. The inputs in the following image should display on your gift product. If the fields are not displaying, ensure that you have "Gift" in your product title.
-
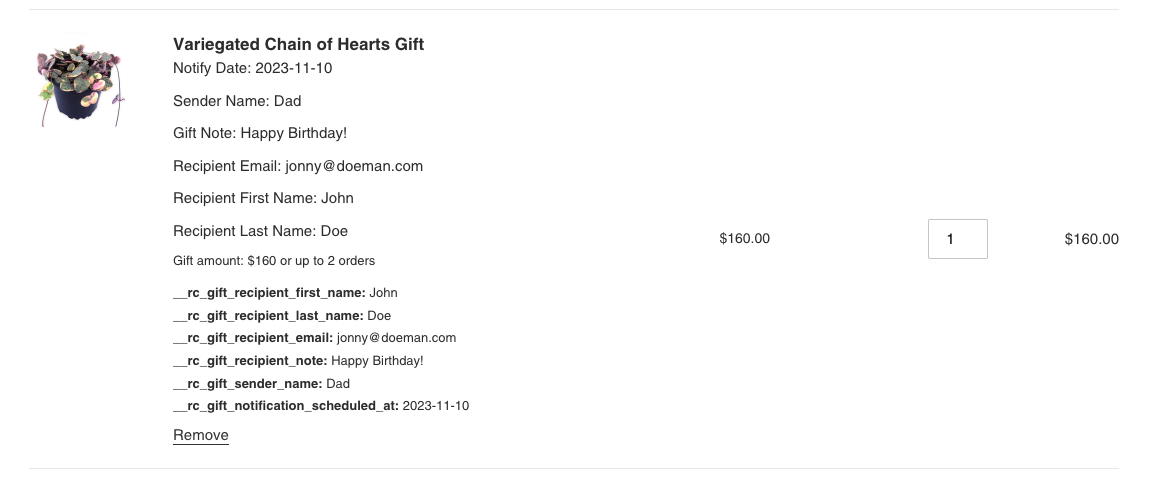
Fill out the field, add the gift item to the cart, and view your cart. Line item properties should display, though the appearance may vary depending on the theme in use. The example theme used is Debut.
-
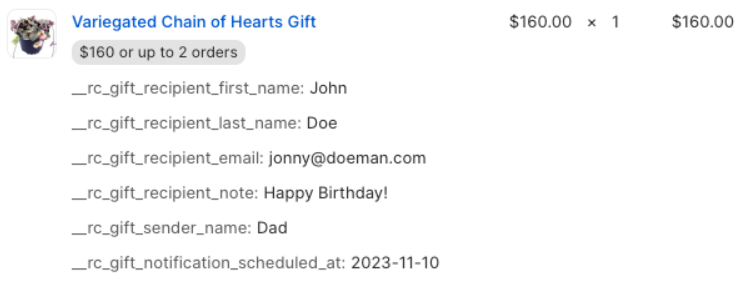
After the order is processed, the line item properties should be attached to the order in Shopify.
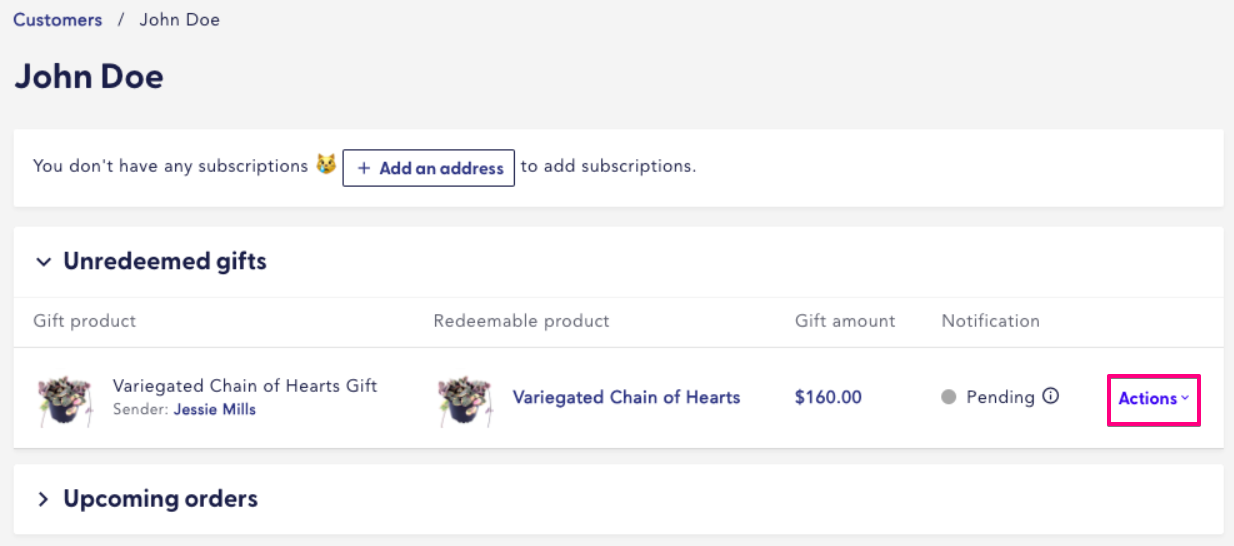
- If the product was correctly set up as a gift product within Recharge, you should see the unredeemed gift in Recharge which will be attached to the new customer (gift recipient). You can click Actions, then select Redemption link to test the full recipient flow.
Updated 7 months ago