Customizing the Legacy Javascript Widget
Change the look and feel of the Legacy Javascript Widget using CSS rules.
This article outlines methods for adding CSS to the widget, selectable classes, and an example for changing the widget's look.
Platform:
- Shopify Checkout Integration
- Migrated Shopify Checkout Integration
Before you start
Recharge recommends using the following best practices when using CSS to customize the widget:
- Before targeting the widget with CSS to customize it, use the built-in customization options within the Recharge merchant portal. For more details on the built-in customization options, see Modifying the subscription widget.
- Only target classes listed in this guide with CSS rules. Do not use DOM selectors to style elements (ie.
div,label). Recharge may change which selectors are used, so this method is recommended. - Recharge does not recommend using JavaScript to change the look or behavior of the widget. You can do this, but Recharge cannot assist with troubleshooting any issues that arise with your theme.
- Although specificity is generally better to override styles, you may use
!importantstatements when needed.
Classes
Refer to the table below for a reference to target specific classes when customizing the widget:
| Name | Class | Description |
|---|---|---|
| Widget Container | .rc-container | Contains both the widget and subscription details |
| Widget | .rc-widget | The widget itself |
| Widget Template Container | .rc-template | Contains the specific widget template |
| Legacy Radio Template | .rc-*template__legacy*-radio | Legacy radio template container. This is the current default template. |
| Radio Template | .rc-template__radio | Radio template container |
| Radio Group Template | .rc-template__radio-group | Radio group template container |
| Button Group Template | .rc-template__button-group | The button group template container |
| Checkbox Template | .rc-template__checkbox | Checkbox template container |
| Option | .rc-option | Will select both one-time and subscribe purchase options |
| Onetime Option | .rc-option__onetime | One-time option |
| Subscribe Option | .rc-option__subsave | Subscribe option |
| Active Option | .rc-option--active | The currently active option |
| Radio | .rc-radio | Targets all radios shown |
| Radio Input | .rc-radio__input | Targets just the radio input |
| Radio Label Container | .rc-radio__label | Targets the radio label |
| Option Label Text | .rc-option__text | Text associated with an option |
| Option Label Price | .rc-option__price | Price associated with an option |
| Option Label Discount | .rc-option__discount | Discount associated with an option |
| Selling Plans Container | .rc-selling-plans | Container for selling plan |
| Selling Plans Label | .rc-selling-plans__label | Label associated with selling plans |
| Selling Plans dropdown | .rc-selling-plans__dropdown | Dropdown for selling plans |
DOM structure
The following is an example of the widget location within the DOM tree.
<div class="rc-container">
  <div class="rc-widget">
    <div class="rc-template">
      <div class="rc-template__legacy-radio"> // this can be any of the different templates
        {...specific template...}
      </div>
    </div>
  </div>
  <!-- <div>subscription details docs TBD</div> -->
</div>
Example CSS
The following is an example using Sass to target and style the widget. To convert to CSS, combine the nested selectors (ie .rc-container .rc-widget .rc-radio__input).
:root {
  --rc-midnight: #191d48;
  --rc-cobalt: #3901f1;
  --rc-paper: #fffbf6;
  --rc-jade: #3c716a;
  --rc-rose: #ffa9bd;
  --rc-magenta: #fd2974;
  --rc-aqua: #99e1d9;
  --rc-iris: #8263e3;
}

.rc-container {
  .rc-widget {
    border: 1px solid var(--rc-jade);
    border-radius: 20px;
    background-color: var(--rc-paper);
    color: var(--rc-midnight);
    overflow: hidden;

    .rc-radio__input {
      border: 0px;
      clip: rect(0px, 0px, 0px, 0px);
      height: 1px;
      width: 1px;
      margin: -1px;
      padding: 0px;
      overflow: hidden;
      white-space: nowrap;
      position: absolute;
    }

    .rc-option {
      color: var(--rc-midnight);
      padding: 8px;
    }

    .rc-option--active {
      color: var(--rc-rose);
      background-color: var(--rc-midnight);
    }

    .rc-selling-plans {
      padding-left: 8px;
    }

    .rc-selling-plans__dropdown {
      color: var(--rc-midnight);
      background-color: var(--rc-rose);
      border-color: var(--rc-jade);
    }
  }
}
Example result
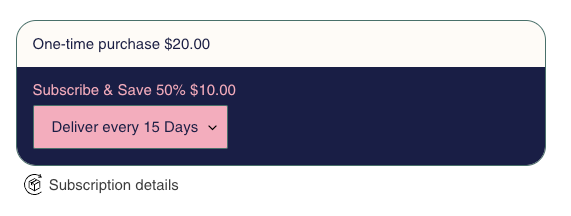
The example below outline shows how the code used above can change the appearance of the widget to match your branding:

Updated 8 months ago
