How-to create a Paid Membership Program using Recharge with Shopify Flow
Learn how to leverage Recharge with Shopify Flow to build a membership tagging program.
The term membership is used in varying contexts with subscriptions. For this guide, membership refers to a paid membership program.
For example, in exchange for a monthly fee, you may want to offer your customers exclusive discounts, exclusive access, early access to products and specific content for a period of time. Typically, this type of access is managed in Shopify through customer tags. You could also consider using Rewards if you want to offer these benefits to all your subscribers as a retention tactic.
This guide walks you through leveraging Recharge and Shopify to automatically add/remove customers’ membership-related tags with a no-code/low-code solution.
Platform
- Shopify Checkout Integration
- Migrated Shopify Checkout Integration
Before you start
- You must use Shopify Flow to configure parts of the paid membership program outlined in this guide. This guide uses Recharge for recurring billing of the paid membership program and Shopify Flow for customer tagging and management.
- This article only explains how to automatically manage customer tags for your paid members for their access/entitlement period. It does not include details on implementing specific membership benefits (ie. discounted shipping, product discounts, or exclusive access to content) that leverage customer tags. It is your responsibility to implement additional solutions beyond the guide’s instructions.
ImportantThis guide discusses custom code and is not supported by Recharge as per the design and integration policy.
Overview
Create a paid membership program for your customers using Recharge for recurring billing and Shopify Flow for managing customer tags and expiration dates.
To create a paid membership program, you must:
- Create a product in Shopify that represents the paid membership. Typically, this is a digital product since paid memberships do not require fulfillment.
- Configure your product’s plans in Recharge to set up recurring billing.
- Build workflows in Shopify Flow to automatically tag customers and manage entitlement periods.
- Leverage the customer tags in your storefront to offer member benefits. You can access these tags in Shopify Liquid to conditionally display pages. You can also access these tags in Shopify Functions and Checkout Extensions to conditionally offer discounted prices on your products for your members. This guide does not include setup instructions for using these options. It is your responsibility to implement additional solutions beyond the guide’s instructions.
With Recharge as the recurring billing solution and Shopify Flow as the tagging system, you can offer customers a membership program when they purchase a paid membership.
How Shopify Flow works with Recharge
Create multiple workflows within Shopify Flow to manage customer tags and membership expiration dates, allowing customers to receive active membership status until their memberships expire. Customer tags are added when a customer checks out with the subscription product configured in Recharge, and are updated when the subscription renews or the customer’s payment fails.
Create the following workflows to offer a membership program using Recharge and Shopify successfully:
- Subscription Contract created workflow: Tags customers when they first purchase the membership product.
- Successful billing attempt workflow: Confirms successful billing and updates customer tags.
- Failed billing attempt workflow: Sets membership as inactive upon billing failure.
- Daily cancelled subscriptions workflow: Identifies and marks inactive customers whose membership periods have expired without renewal.
Step 1 - Create the membership product in Shopify
- Create a Shopify product that customers purchase to become paid members. Typically, you create this as a digital product since paid memberships do not require fulfillment.
- Recharge recommends leaving the product in draft status or not assigning it to any sales channel until you have completed the rest of the steps in this guide and tested the flow
For this guide, Recharge recommends creating separate products for your membership offerings rather than using a single product with multiple purchase options.
For example:
- One product for a one-time purchase
- One product for a subscription-based membership (for example, monthly or annual)
Using separate products lets you configure your Shopify Flow workflows with product IDs only, simplifying your setup and reducing the risk of issues from changes to subscription configurations.
Step 2 - Create plans for the membership product in Recharge
- Add plans for the membership product you created in Step 1.
- Configure the frequency options for your membership product.
- Note the Product ID for your membership products.
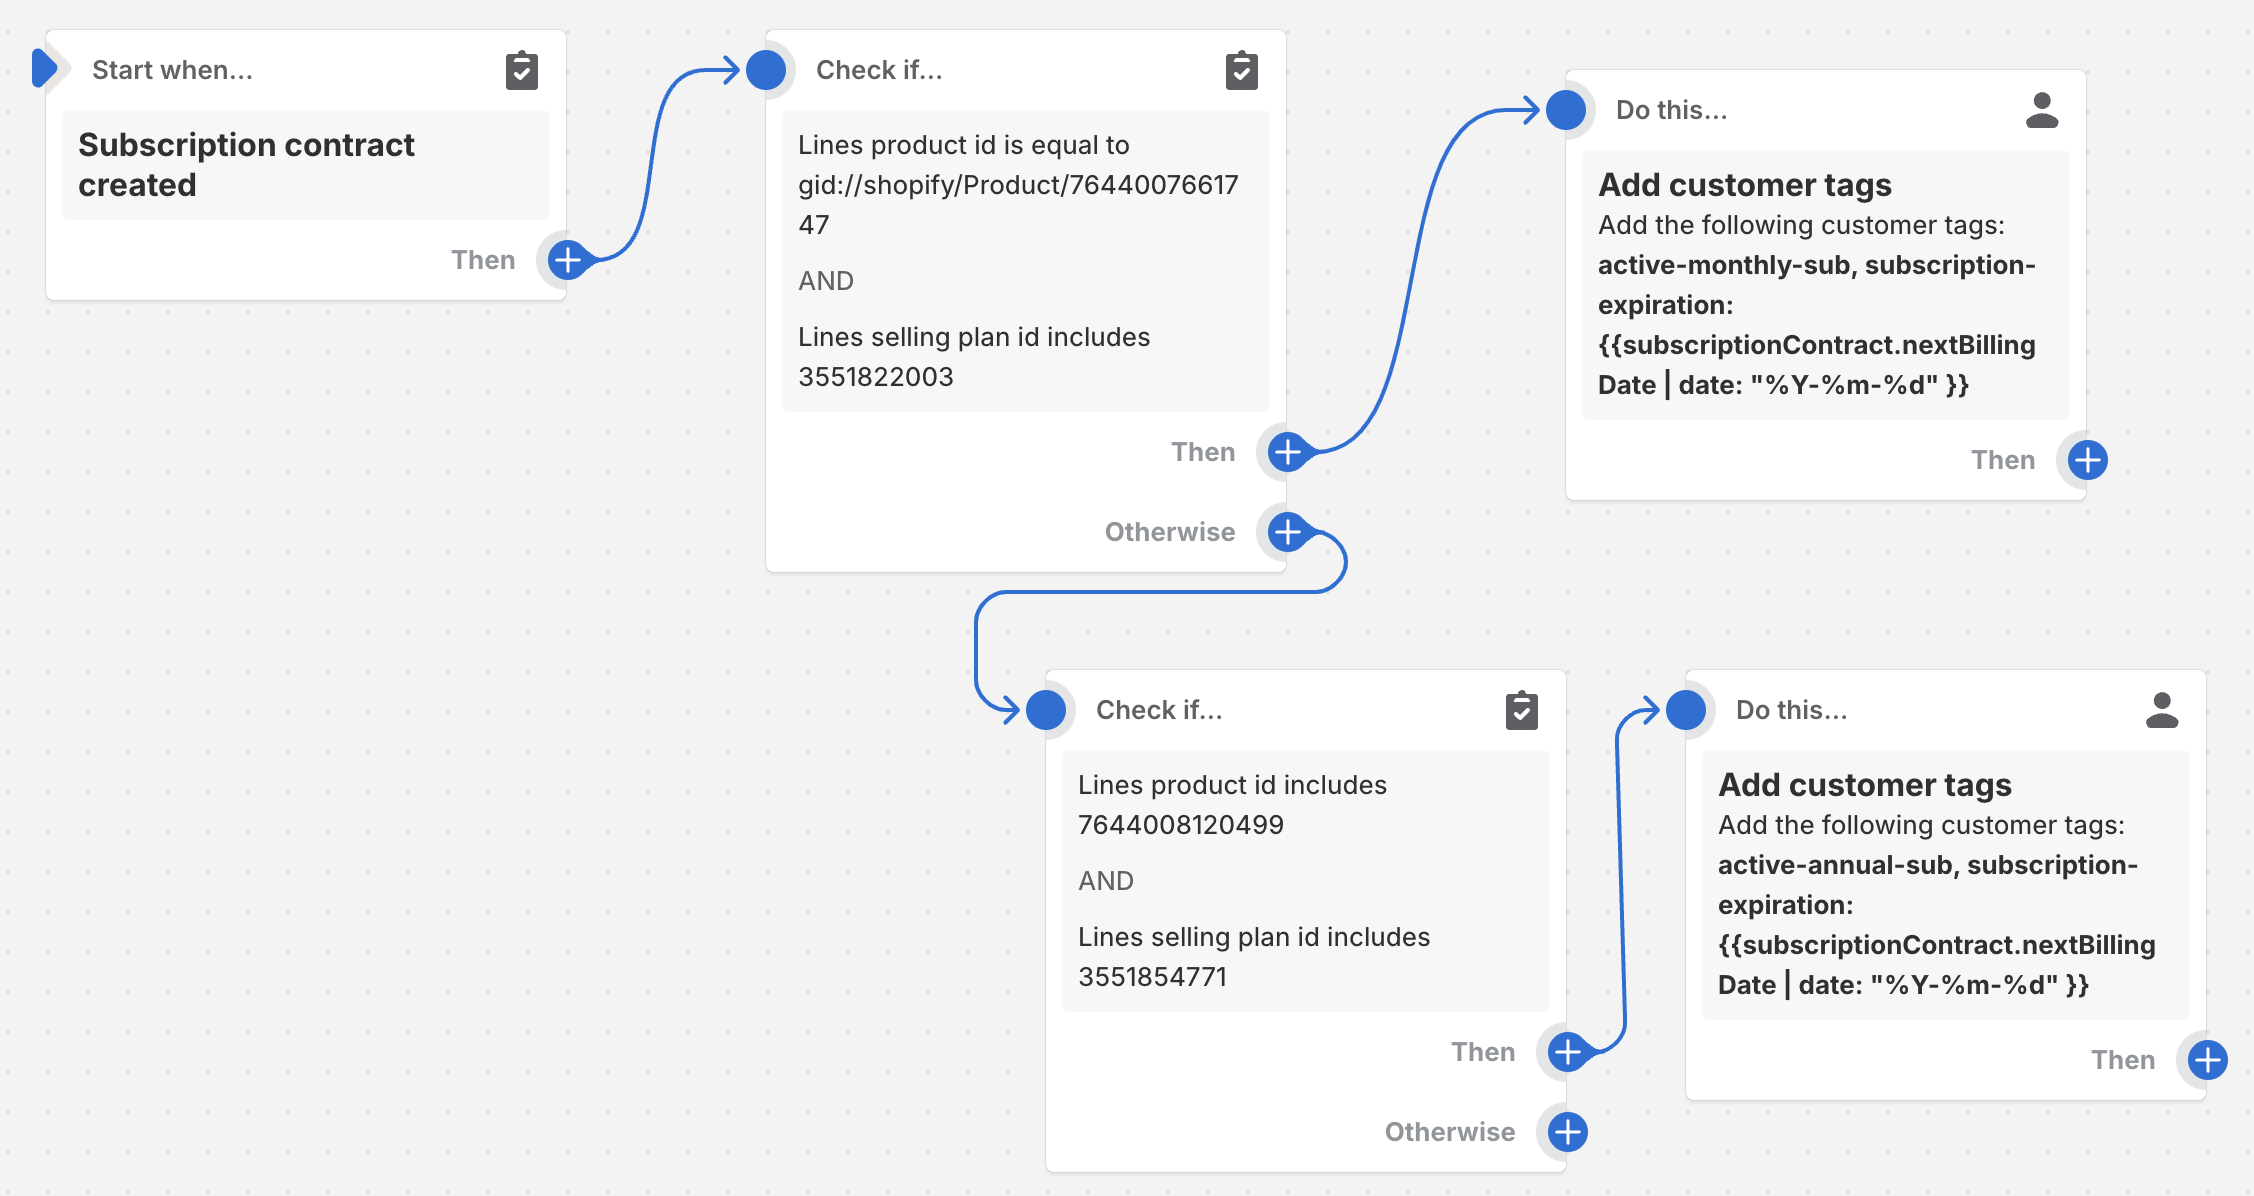
Step 3 - Build the Subscription Contract created workflow
Create the first workflow that executes when customers purchase the subscription membership product. Shopify creates a subscription contract when a customer purchases a subscription. This flow triggers when a customer purchases a membership through your storefront, creating a subscription contract.
Step 1 - Create the workflow
- Log in to your Shopify admin.
- Select Flow from your list of apps.
- Click Create new workflow.
Step 2 - Create the trigger
Define the event that starts the workflow:
- Click Select a trigger.
- Click Shopify as the trigger.
- Search for and select Subscription Contract Created.
Step 3 - Add conditions for a monthly membership
Use the product ID to determine which products customers must purchase to join your membership program:
- Click Then on the Subscription Contract Created trigger and select Condition.
- Click on Select condition to add your conditions.
- Set the conditions to only trigger the workflow if all conditions are met.
- Click Add criteria to configure the product condition.
- Select SubscriptionContracts and then lines to select the productId condition. Click on productID. Set the condition to
equal toand enter the product ID in the ProductId field. - Click X to add the conditions to the workflow.
Optional - Add the product conditions for an annual membership
Create multiple membership programs (ie. one for a monthly membership product and one for an annual membership product) in the same workflow:
- Click Otherwise on the Condition and select Condition.
- Click on Select condition to add your conditions.
- Set the conditions to only trigger the workflow if all conditions are met.
- Click Add criteria to configure the product condition.
- Select SubscriptionContracts and then lines to locate the productId condition. Click on productID. Set the condition to
equal toand enter the product ID for your annual membership product in the ProductId field. - Click X to add the conditions to the workflow.
Step 4 - Create the customer tags action
Configure your workflow to perform an action and automatically add customer tags to customers who check out with the monthly membership product:
- Click Then on the conditions and select Actions.
- Search for
tagin the search bar and select Add customer tags. - Add the following tags:
active-monthly-subsubscription-expiration: {{ subscriptionContract.nextBillingDate | date: "%Y-%m-%d" }}
- Click X to add the Actions to the workflow.

The subscription-expiration tag sets the expiry to the next billing date which is leveraged in the Daily cancelled subscriptions workflow step. Use the subscription-expiration tag to manage entitlement periods for your members.
NoteYou can use any naming convention you prefer when adding customer tags. If you decide to use different customer tags in this step, ensure that you reference the correct tags throughout the rest of the flow setup steps, as this guide uses the tags listed above when outlining setup instructions.
Optional - Create the customer tags action for the second condition
Add different customer tags to customers who check out with the annual membership product:
- Click Then on the second conditions box created for your annual product and select Actions.
- Search for
tagin the search bar and select Add customer tags. - Add the following tags:
active-annual-subsubscription-expiration: {{ subscriptionContract.nextBillingDate | date: "%Y-%m-%d" }}
- Click X to add the Actions to the workflow.
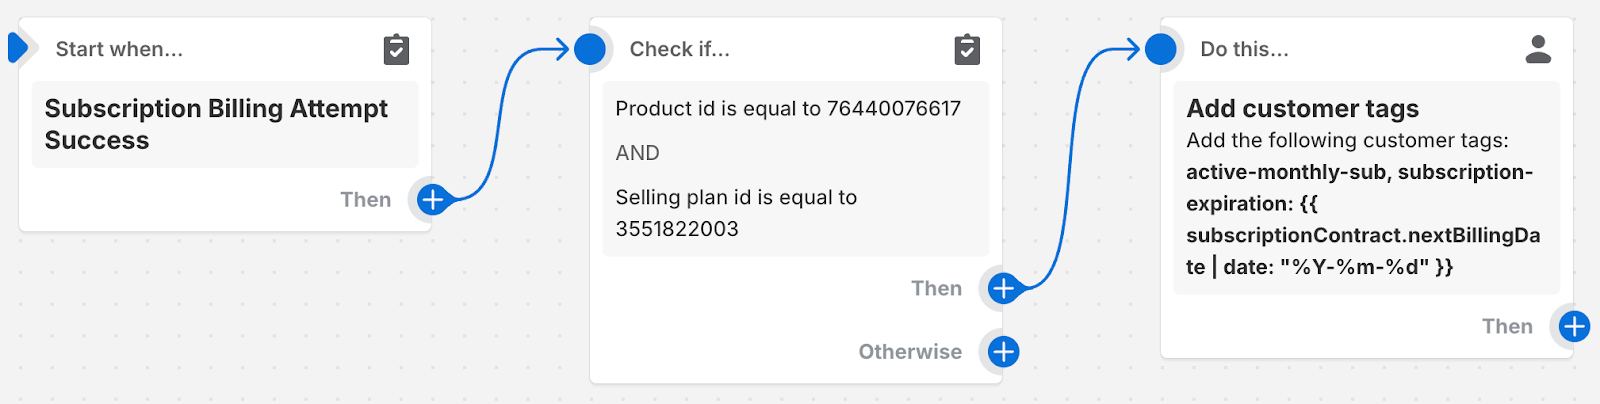
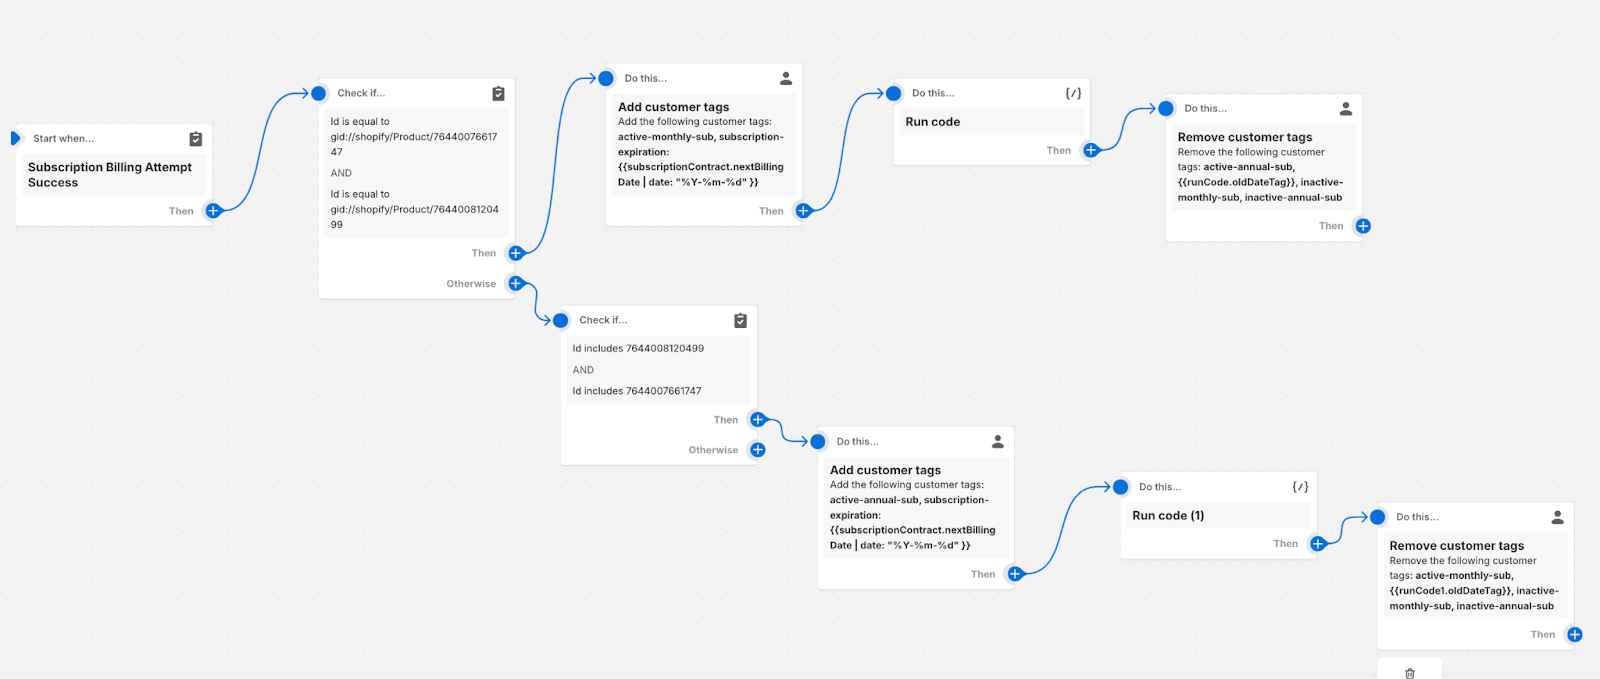
Step 4 - Build the Successful billing attempt workflow
Create a workflow that executes when Recharge successfully charges customers for their recurring membership fees:
Step 1 - Create the workflow
- Select Flow from your list of apps in your Shopify admin.
- Click on create workflow.
Step 2 - Create the trigger
- Define the event that starts the workflow:
- Click Select a trigger.
- Click Shopify as the trigger.
- Search for and select Subscription Billing Attempt Success.
Step 3 - Add the product conditions
Use the product ID to determine which products Recharge must charge customers for so that they can continue being a part of your monthly membership program:
- Click Then on the Subscription Billing Attempt Success trigger and select Condition.
- Click on Select condition to add your conditions.
- Set the conditions to only trigger the workflow if all conditions are met.
- Click Add criteria to configure the product condition.
- Select SubscriptionContracts and then lines to locate the productId condition. Click on ProductId. Set the condition to
equal toand enter the product ID in the ProductId field. - Click X to add the conditions to the workflow.
Optional - Add the product conditions for the annual membership
Use the product ID to determine which products Recharge must charge customers for so that they can continue being a part of your annual membership program:
- Click Otherwise on the Condition and select Condition.
- Click on Select condition to add your conditions.
- Set the conditions to only trigger the workflow if all conditions are met.
- Click Add criteria to configure the product condition.
- Select SubscriptionContracts and then lines to locate the productId condition. Click on ProductId. Set the condition to
equal toand enter the product ID for your annual membership product in the ProductId field. - Click X to add the conditions to the workflow.
Step 4 - Create the customer tags action
Automatically add customer tags to customers who are successfully charged the monthly membership fee:
- Click Then under conditions, then select Actions.
- Search for
tagin the search bar and select Add customer tags. - Add the following tags:
active-monthly-subsubscription-expiration: {{ subscriptionContract.nextBillingDate | date: "%Y-%m-%d" }}
- Click X to add the Actions to the workflow.
Notice that you must set the subscription-expiration tags again. The subscription-expiration tags are leveraged in the Daily cancelled subscriptions workflow steps so that you can manage entitlement periods for your members.
Optional - Create the customer tags action for the second condition
Add different customer tags to customers who are charged the annual membership fee:
- Click Then on the second conditions box created for your annual product and select Actions.
- Search for
tagin the search bar and select Add customer tags. - Add the following tags:
active-annual-subsubscription-expiration: {{ subscriptionContract.nextBillingDate | date: "%Y-%m-%d" }}
- Click X to add the Actions to the workflow.
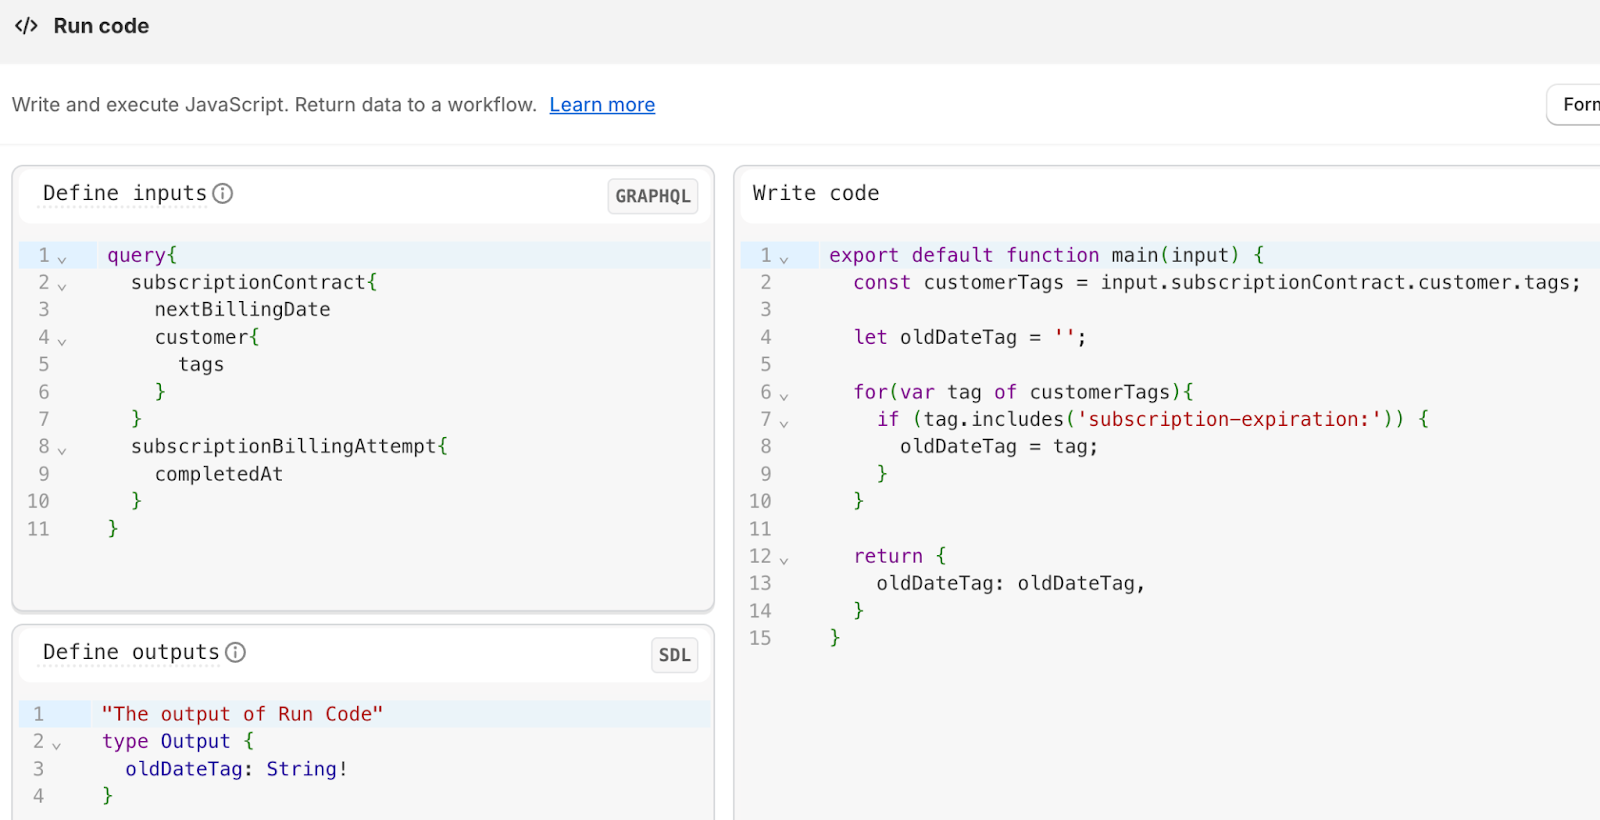
Step 5 - Add the Run code action
Access to membership content relies on the successful billing date. Remove previous customer tags from the last billing period, and any additional tags automatically with the Run code action:
-
Select Then on the actions node and choose Action.
-
Search for
Run codeand click on that action. -
Add the following code in the Write code textbox:
1. export default function main(input) { const customerTags = input.subscriptionContract.customer.tags; let oldDateTag = ''; for(var tag of customerTags){ if (tag.includes('subscription-expiration:')) { oldDateTag = tag; } } return { oldDateTag: oldDateTag, } } Add the following inputs in the Define inputs box: query{ subscriptionContract{ nextBillingDate customer{ tags } } subscriptionBillingAttempt{ completedAt } } Add the following outputs in the Define outputs box: "The output of Run Code" type Output { oldDateTag: String! } -
Add the following inputs in the Define inputs box:
query{ subscriptionContract{ nextBillingDate customer{ tags } } subscriptionBillingAttempt{ completedAt } } -
Add the following outputs in the Define outputs box:
"The output of Run Code" type Output { oldDateTag: String! } -
Click X.
-
Select Then on your Run code action node and select Action.
-
Search for
remove tagin the search bar and select Remove customer tags. -
Remove the following tags:
{{runCode.oldDateTag}}inactive-monthly-subactive-annual-subinactive-annual-sub

Optional - Add the Run Code action for annual subscriptions
-
Select Then on the actions node for your annual membership option and choose Action.
-
Search for
Run codeand click on that action. -
Add the following code in the Write code textbox:
export default function main(input) { const customerTags = input.subscriptionContract.customer.tags; let oldDateTag = ''; for(var tag of customerTags){ if (tag.includes('subscription-expiration:')) { oldDateTag = tag; } } return { oldDateTag: oldDateTag, } -
Add the following inputs in the Define inputs box:
query{ subscriptionContract{ nextBillingDate customer{ tags } } subscriptionBillingAttempt{ completedAt } } -
Add the following outputs in the Define outputs box:
"The output of Run Code" type Output { oldDateTag: String! -
Click X.
-
Select Then on your Run code action node and select Action.
-
Search for
remove tagin the search bar and select Remove customer tags. -
Remove the following tags:
{{runCode.oldDateTag}}inactive-annual-subactive-monthly-subinactive-monthly-sub
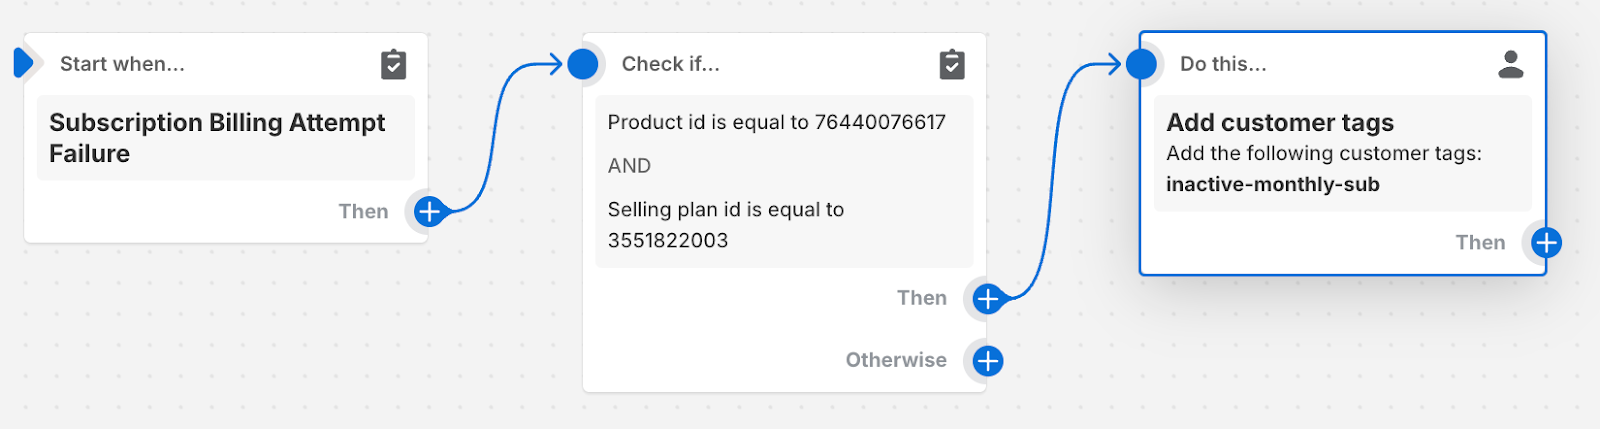
Step 5 - Build the Failed billing attempt workflow
Create a workflow that executes when Recharge’s attempt to charge a customer their membership fees fails. Billing attempts can fail for various reasons.
This flow removes customer tags the moment a customer’s renewal fails. The membership tags are only readded through the Successful Billing flow if payment is successfully captured at a later date (ex. three days later). You must implement additional logic to support customers with failed billing by providing a grace period if their billing attempts fail.
Step 1 - Create the workflow
- Log in to your Shopify admin and select Flows from your list of apps.
- Click on create workflow.
Step 2 - Create the trigger
Define the event that starts the workflow:
- Click Select a trigger.
- Click Shopify as the trigger.
- Search for and select Subscription Billing Attempt Failure.
Step 3 - Add the product conditions
- Use the product IDassociated with your monthly membership program:
- Click Then on the trigger and select Condition.
- Click on Select condition to add your conditions.
- Set the conditions to only trigger the workflow if all conditions are met.
- Click Add criteria to configure the product condition.
- Select SubscriptionContracts and then lines to locate the productId condition. Click on productId. Set the condition to
equal toand enter the product ID in the productId field. - Click X to add the conditions to the workflow.
Optional - Add the product conditions for the annual membership
Use the product ID associated with your annual membership program:
- Click Otherwise on the Condition and select Condition.
- Click on Select condition to add your conditions.
- Set the conditions to only trigger the workflow if all conditions are met.
- Click Add criteria to configure the product condition.
- Select SubscriptionContracts and then lines to locate the productId condition. Click on productId. Set the condition to
equal toand enter the product ID for your annual membership product in the ProductId field. - Click X to add the conditions to the workflow.
Step 4 - Create the customer tags action
Automatically add customer tags to customers whose billing attempt for the monthly membership fee failed:
- Click Then on the conditions and select Actions.
- Search for
tagin the search bar and select Add customer tags. - Add the following tag:
inactive-monthly-sub
- Click X to add the Actions to the workflow.
- Click Then on the action and add a second action.
- Search for
tagin the search bar and select Remove customer tags. - Remove the following tag:
active-monthly-sub
- Click X to add the Actions to the workflow.
Optional - Create the customer tags action for the annual membership condition
Add different customer tags to customers whose billing attempt for the annual membership fee failed:
- Click Then on the conditions set for your annual membership product and select Actions.
- Search for
tagin the search bar and select Add customer tags. - Add the following tag:
Inactive-annual-sub
- Click X to add the Actions to the workflow.
- Click Then on the action and add a second action.
- Search for
tagin the search bar and select Remove customer tags. - Remove the following tag:
Active-monthly-sub
- Click X to add the Actions to the workflow.
Step 6 - Build the daily cancelled subscriptions workflow
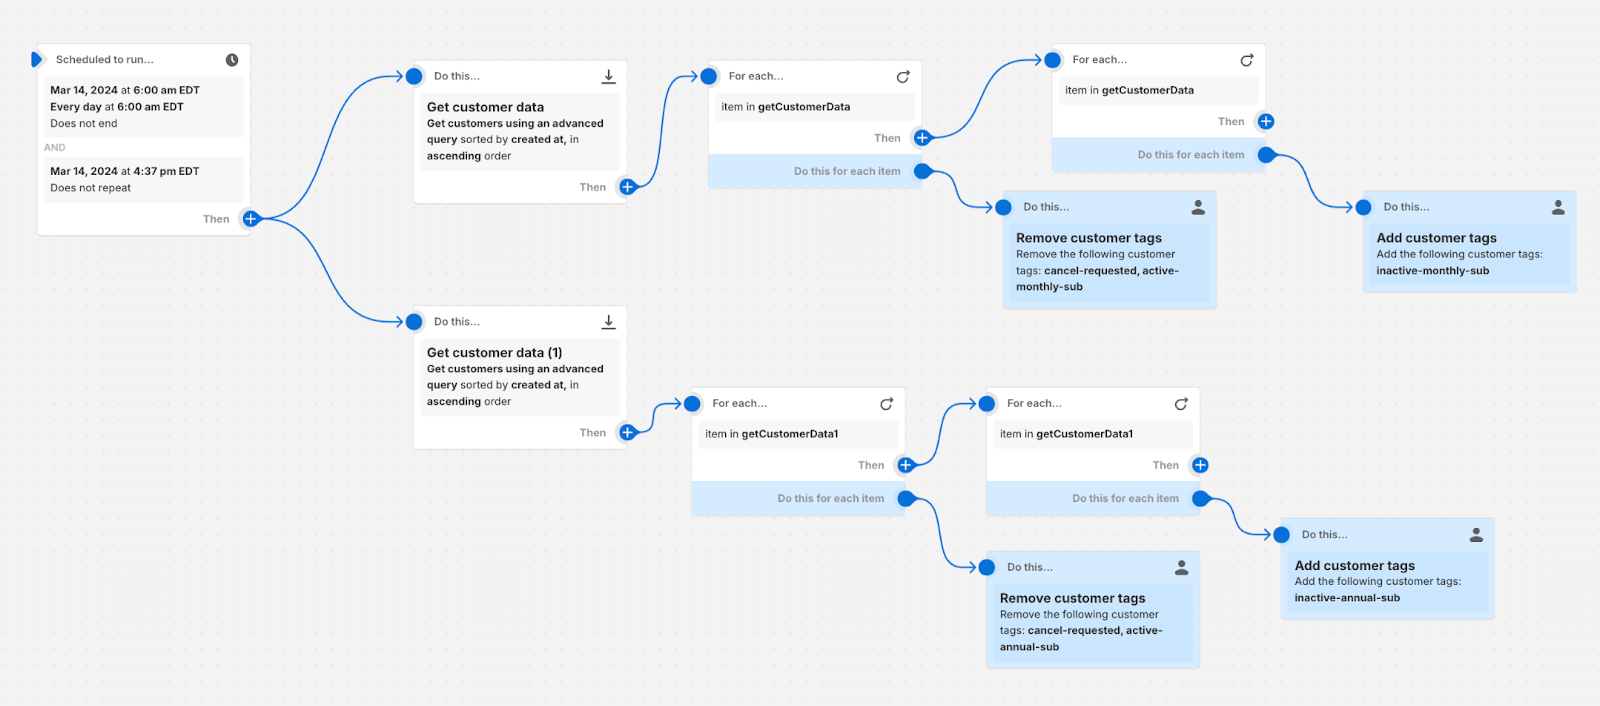
Build a workflow to execute a daily cron job and determine which customers have not renewed and are past their membership entitlement period. Use the workflow actions to mark these customers inactive, ensuring they are no longer considered members.
WarningShopify only allows queries of up to 100 records per daily cron job. To increase the number of pre-canceled subscriptions queried, you must schedule multiple run executions per day.
Step 1 - Create the workflow
- Select Flows from your list of apps in your Shopify admin.
- Click on create workflow.
Step 2 - Create the trigger
Set the workflow to trigger daily:
- Click Select a trigger.
- Click Shopify as the trigger and search for
Scheduled time. - Click Scheduled time to set it as the trigger.
- Use today’s date as the Start of the trigger.
- Click Add repeat and set the repeat frequency to 1 day.
- Click Add schedule.
- Set the Schedule to today’s date.
NoteAs Shopify only allows 100 records per daily cron job, you may need to add additional schedules to perform the workflow multiple times per day.
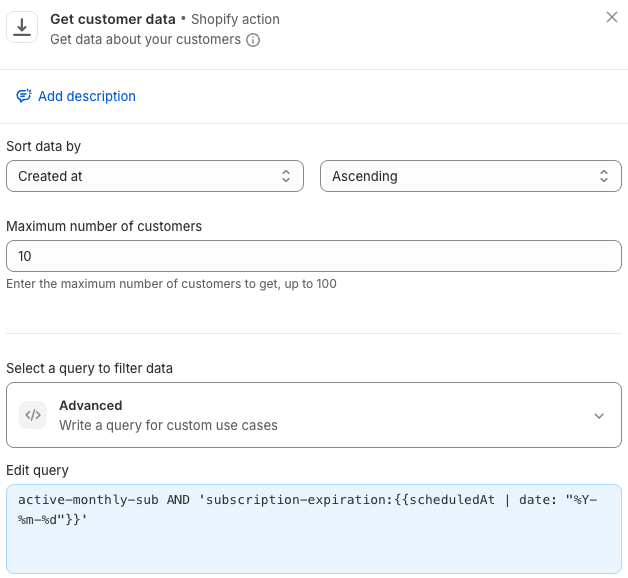
Step 3 - Configure the Action to retrieve customer data for monthly members
Configure a workflow action to retrieve customer data daily:
- Click Then on the trigger node and select Action.
- Search for
Get customer dataand click on the Action. - Select Advanced from the query options and add the following query:
active-monthly-sub AND 'subscription-expiration:{{scheduledAt | date: "%Y-%m-%d"}}' - Click X to leave the Action setup screen.
Optional - Configure the Action to retrieve customer data for annual members
- Click Then on the trigger node and select Action.
- Search for
Get customer dataand click on the Action. - Select Advanced from the query options and add the following query:
active-annual-sub AND 'subscription-expiration:{{scheduledAt | date: "%Y-%m-%d"}}' - Click X to leave the Action setup screen.
Step 4 - Create the loop Action for monthly members
- Click Then on the customer data action node and select Action.
- Search for
loopand click on the For each loop action. - Click List and search for
Get customer data. - Select the
Get customer datalist. - Click X to leave the Action setup screen.
Optional - Create the loop Action for annual members
- Click Then on the annual customer data action node and select Action.
- Search for
loopand click on the For each loop action. - Click List and search for
Get customer data. - Select the
Get customer datalist. - Click X to leave the Action setup screen.
Step 5 - Set the loop action to review the list of monthly members
- Click the Do this for each item on the
getCustomerDataaction node previously configured. - Select Action.
- Search
tagand select Remove customer tag. - Remove the following customer tag:
active-monthly-sub
- Click X to leave the Action setup screen.
Optional - Set the loop action to review the list of annual members
- Click the Do this for each item on the
getCustomerDataaction node previously configured. - Select Action.
- Search
tagand select Remove customer tag. - Remove the following customer tag:
active-annual-sub
- Click X to leave the Action setup screen.
Step 6 - Review the list of monthly members and add the inactive tag
Set the workflow action to iterate through a customer list, retrieve customer data, and add the inactive subscriber customer tags for monthly members:
- Click Then on the
getCustomerDataaction node previously configured and select Action. - Search list and select For each loop (iterate) from the available actions.
- Click List and search for
Get customer data. - Select the Get customer data list.
- Click X to leave the Action setup screen.
- Click Do this for each item and select Action.
- Search
tagand select Add customer tag. - Add the following customer tag:
inactive-monthly-sub
- Click X to leave the Action setup screen.

Optional - Review the list of annual members and add the inactive tag
Set the workflow action to iterate through a customer list, retrieve customer data, and add the inactive subscriber customer tags for annual members:
- Click Then on the
getCustomerDataaction node previously configured and select Action. - Search list and select For each loop (iterate) from the available actions.
- Click List and search for
Get customer data. - Select the Get customer data list.
- Click X to leave the Action setup screen.
- Click Do this for each item and select Action.
- Search
tagand select Add customer tag. - Add the following customer tag:
inactive-annual-sub
- Click X to leave the Action setup screen.
Step 7 - Activate and the workflows
When you’re ready, click on each workflow you created in the Flow menu, and select Turn on workflow to activate the workflow.

Test your workflows
Recharge recommends testing the workflows after activation to ensure everything works as expected. Testing steps differ depending on the workflow:
Subscription Created
- Place a test checkout order.
- Review your customer account in Shopify and confirm that the relevant tags are recorded.
Billing attempt success
- Manually delete the active and expiration date tags from your test customer account in Shopify.
- Navigate to your test customer in your Recharge merchant portal and process the recurring order immediately.
- Review the test customer in Shopify and confirm that the flow added the correct customer tags to the account.
Billing attempt failure
It is difficult to test this flow due to the nature of Shopify’s Subscriptions API. It’s important to keep an eye on any failed payments for members and ensure that the flow works as expected once active.
Daily cancelled subscriptions
The following test instructions assume that the cron is set to run daily:
- Manually update a customer’s expiration tag to the next day the cron is set to run (typically tomorrow’s date).
- Review the tags for your test customer in your Shopify admin and confirm that the
activetag changed toinactive.
NoteRecharge recommends monitoring tagging with early cohorts of customers to ensure that the workflow logic applies as intended. Depending on your unique needs, you may need to adjust the flow logic to accommodate different membership setups.
Updated 4 months ago